바닐라 자바스크립트 시작(3)
출처 및 참고 :
- 노마드 코더 챌린지 바닐라 자바스크립트로 크롬 앱 만들기 : https://nomadcoders.co/
- HTML Document Reference : https://developer.mozilla.org/ko/
복습 차원
* 꼭 이해해야 할 거 : 우리가 하고 있는 app.js가 있기 때문에 javascript를 통해 HTML의 내용을 가져올 수 있는 것이다

* 좀더 구체적인 엘리먼트를 선택 : querySelector , querySelectorAll
- getElement ~~ 보다 구체적으로 element를 지정 가능하다.
* 포인트 : document가 HTML이 app.js를 load하기 때문에 존재하는 것임. 그 다음에 브라우저에서 우리가 document에 접근할 수 있게 해준다.


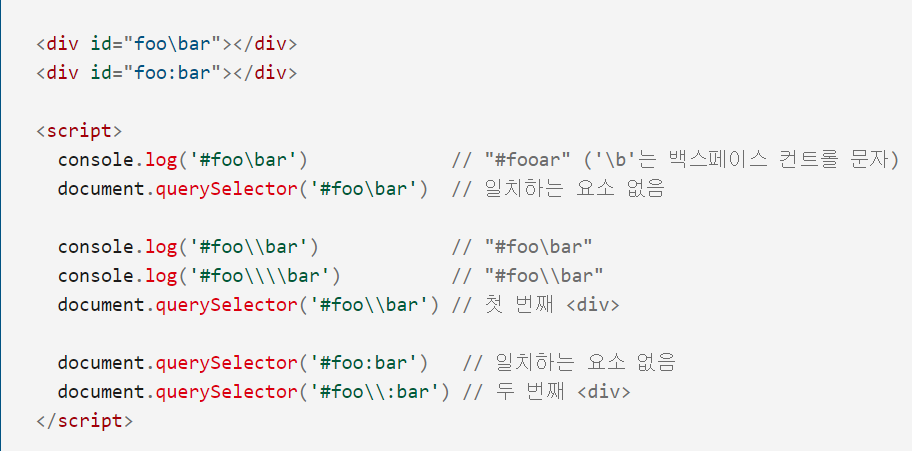
# querySelector, querySelectorAll
const title = document.querySelector(".hello h1");
title.innerText = "Hello time";
- 위의 코드에서 querySelector가 의미하는 바는 무엇일까 ?
    <div class="hello">
        <h1>Grab me!1</h1>
    </div>
    <div class="hello">
        <h1>Grab me!2</h1>
    </div>
    <div class="hello">
        <h1>Grab me!3</h1>
    </div>
바로 " hello 라는 class 내부의 h1을 가지고 온다. " 라는 뜻이다.
그리고 이렇게 여러 방법으로도 가능하다
const title = document.querySelector(".hello"); // 해당 코드의 의미 : hello란 class를 가진 element를 하나 가지고 올 수 있다.
const title = document.querySelectorAll(".hello"); // hello라는 이름의 class를 전부 가져올 수 있다.
const title = document.querySelector("#hello:first-child");
const title = document.querySelector(".hello:first-child h1");

const title = document.querySelector("div.hello:first-child h1");  // class hello를 가진 div 내부의 first-child인 h1을 찾아오는 것. css selector를 전달할 수 있다.
// javascript는 여기 해당 element에 접근할 수 있게 해준다.
querySelectorAll은 아래와 같이 쓸 수 있다.

# element의 내부 확인해보기
console.dir(objectname);

이런식으로 element의 내부를 확인할 수 있는데 보게되면 많은 object들을 확인할 수 있다.
또 이 내부에 있는 property 값들을 변경할 수도 있다. (특정 property는 변경 불가하다)

- html 태그의 h1 element style도 확인할 수가 있다.

- 한번 h1 > style > color object의 property를 변경해보자.
title.style.color="blue";
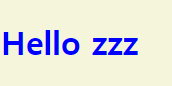
색이 파란색으로 바뀌는것을 볼 수 있다.
이런식으로 style 안의 object property를 변경 가능하다.

아주 기초적인 내용들을 학습하고 정리해봤는데 완전하게 정리가 안된 느낌이다. 담에는 제대로 정리해보겠다 ㅎㅎ